Photo to pencil sketch
(Tutorial)
(1) Open your original image in Photoshop.
Go to Layer > New Fill Layer > Solid Color,
call it "Gray Fill," and click OK.
In the Color Picker, choose a light gray.
 (2) Click the "Create new fill or adjustment layer" icon at the base of the Layers palette and choose Pattern from the list.
Click in the Pattern Swatch in the dialog box, hit the right-pointing arrow, and select Grayscale Paper.
Choose Fibers 1 from the swatch.
Increase the Pattern Scale to 340% and click OK. Set this layer to
Soft Light, and 35% opacity.
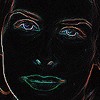 (3) Right-click/Ctrl-click the background layer and choose Duplicate Layer, calling the layer "Glowing Edges."
Drag this new layer to the top of the stack and go to
Filter > Stylize > Glowing Edges.
Use these values:
Edge Width 3, Edge Brightness 11, Smoothness 10.
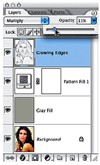 (4) Invert the Glowing Edges layer using
Image > Adjustments > Invert (Ctrl/Cmd+I).
This layer only needs to be black and white, so go to
Image > Adjustments > Desaturate (Ctrl/Cmd+Shift+U).
Set the layer's blending mode to Multiply with an opacity of 15%.
 (5) Duplicate the background layer again, calling it "Sketch Layer," and drag this duplicate to the top of the stack.
Desaturate this layer using Image
> Adjustments > Desaturate (Ctrl/ Cmd+Shift+U).
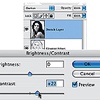
To use the layer as a base for the drawing, increase the contrast a little, by going to
Image > Adjustments > Brightness and Contrast. Drag the Contrast slider to the right to a value of 22.
Now set the layer blending mode to Darken and leave the opacity set to 100%.
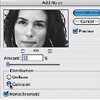 (6) We need to add some Noise to this layer to break the image up a little, so go to
Filter > Noise > Add Noise.
Use an Amount of 12%, choose Gaussian for Distribution, and check Monochromatic.
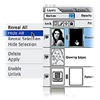 (7) Add a Hide All layer mask to this layer using Layer > Layer Mask > Hide All.
To make the drawing, simply scribble on this layer mask using a special brush.
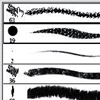 (8) Select the Brush tool and click in the Brush Picker.
Click the right-pointing arrow in the Picker and choose Dry Media Brushes. Scroll down the thumbnails and double-click Pastel on Charcoal Paper.
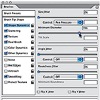 (9) Hit F5 on the keyboard to display the Brush Options.
Click the Other Dynamics panel and set the Opacity Jitter Control box to Pen Pressure.
Click Shape Dynamics and set the Size Jitter to Pen Pressure.
Set Minimum Diameter to 70%.
Remember, if you are not using a graphics tablet, you must control the opacity of the Brush using the Opacity slider in the Options bar.
(Tutorial)
(1) Open your original image in Photoshop.
Go to Layer > New Fill Layer > Solid Color,
call it "Gray Fill," and click OK.
In the Color Picker, choose a light gray.
 (2) Click the "Create new fill or adjustment layer" icon at the base of the Layers palette and choose Pattern from the list.
 Click in the Pattern Swatch in the dialog box, hit the right-pointing arrow, and select Grayscale Paper.
Choose Fibers 1 from the swatch.
Increase the Pattern Scale to 340% and click OK. Set this layer to
Soft Light, and 35% opacity.
 (3) Right-click/Ctrl-click the background layer and choose Duplicate Layer, calling the layer "Glowing Edges."
 Drag this new layer to the top of the stack and go to
Filter > Stylize > Glowing Edges.
Use these values:
Edge Width 3, Edge Brightness 11, Smoothness 10.
 (4) Invert the Glowing Edges layer using
 Image > Adjustments > Invert (Ctrl/Cmd+I).
This layer only needs to be black and white, so go to
Image > Adjustments > Desaturate (Ctrl/Cmd+Shift+U).
Set the layer's blending mode to Multiply with an opacity of 15%.
 (5) Duplicate the background layer again, calling it "Sketch Layer," and drag this duplicate to the top of the stack.
 Desaturate this layer using Image
> Adjustments > Desaturate (Ctrl/ Cmd+Shift+U).
To use the layer as a base for the drawing, increase the contrast a little, by going to
Image > Adjustments > Brightness and Contrast. Drag the Contrast slider to the right to a value of 22.
Now set the layer blending mode to Darken and leave the opacity set to 100%.
 (6) We need to add some Noise to this layer to break the image up a little, so go to
 Filter > Noise > Add Noise.
Use an Amount of 12%, choose Gaussian for Distribution, and check Monochromatic.
 (7) Add a Hide All layer mask to this layer using Layer > Layer Mask > Hide All.
 To make the drawing, simply scribble on this layer mask using a special brush.
 (8) Select the Brush tool and click in the Brush Picker.
 Click the right-pointing arrow in the Picker and choose Dry Media Brushes. Scroll down the thumbnails and double-click Pastel on Charcoal Paper.
 (9) Hit F5 on the keyboard to display the Brush Options.
 Click the Other Dynamics panel and set the Opacity Jitter Control box to Pen Pressure.
Click Shape Dynamics and set the Size Jitter to Pen Pressure.
Set Minimum Diameter to 70%.
Remember, if you are not using a graphics tablet, you must control the opacity of the Brush using the Opacity slider in the Options bar.


0 comments :
Post a Comment